

It’s 12 am and I want to create a Python library for neural networks from scratch and use it to train on Mnist and get an accuracy of 90%.
(Spoiler: I pulled it off.)
lets get started
Fun fact [I don’t even know python]
and Also tomorrow I have Lab Exam for Web development, screw it I already know enough of it!
[I am going for AXON as a library name]
https://medium.com/analytics-vidhya/how-to-create-a-python-library-7d5aea80cc3f
Following this article to make a library
project setup done and learned how to create libraries in python [30 mins into the challenge 12:30]
- Create a Neuron, basic unit of neural network
Created a simple neuron
import numpy as npclass Neuron:
def __init__(self, num_inputs, activation_function):
self.weights = np.random.rand(num_inputs)
self.bias = np.random.randn()
self.activation_function = activation_function
def forward(self, inputs):
"""Compute the neuron's output."""
z = np.dot(self.weights, inputs) + self.bias
return self.activation_function(z)
- Now lets create an Activation function, initially I will implementing a Sigmoid Activation function (more will come later)
here is a sigmoid function
import numpy as npdef sigmoid(x):
"""Computes the sigmoid activation function."""
return 1 / (1 + np.exp(-x))
[I am using chatgpt for my test cases: too lazy to write on my own]
So till now we have acheived a basic neuron which takes inputs and a activation function to compute a result — Base layer is done ✨

Here is the 1D input into the neuron with just one input per
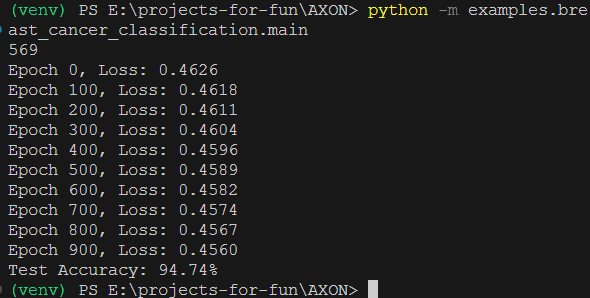
Now I am going to use my base layer to classify the breast cancer
https://www.kaggle.com/datasets/uciml/breast-cancer-wisconsin-data/data
here is the dataset
Lets prepare the training set, by turning the Malignant (M) into 1 and (B) into 0 from the Diagnosis column
import numpy as np
import pandas as pd
from sklearn.model_selection import train_test_split
from sklearn.preprocessing import StandardScaler
from axon.layers.base import Neuron
from axon.activations.sigmoid import sigmoid, sigmoid_derivativedata = pd.read_csv("examples/breast_cancer_classification/breast_cancer_data.csv")
data['diagnosis'] = data['diagnosis'].map({'M': 1, 'B': 0})
data = data.drop(columns=["Unnamed: 32"], errors="ignore")
print(data.shape[0])
# X (Features):
# Excludes the first two columns (ID and Diagnosis).
# Selects only the numeric feature columns (from the 3rd column onwards).
# y (Target):
# Stores the diagnosis column (0 or 1).
X = data.iloc[:, 2:].values
y = data['diagnosis'].values
# Normalize the Features
scaler = StandardScaler()
X = scaler.fit_transform(X)
# Splits the dataset into:
# 80% for training (X_train, y_train)
# 20% for testing (X_test, y_test)
# random_state=42 ensures that the split is reproducible.
X_train, X_test, y_train, y_test = train_test_split(X, y, test_size=0.2, random_state=42)
# initialize the neuron
neuron = Neuron(num_inputs=X.shape[1], activation_function=sigmoid)
def train_neuron(neuron, X, y, lr=0.001, epochs=1000):
for epoch in range(epochs):
predictions = np.array([neuron.forward(x) for x in X])
errors = predictions - y
# Apply Sigmoid Derivative
gradients = errors * sigmoid_derivative(predictions)
# Compute Gradients
dW = np.dot(gradients, X) / len(y)
db = np.mean(gradients)
# Update Weights and Bias
neuron.weights -= lr * dW
neuron.bias -= lr * db
# Compute Loss
epsilon = 1e-10 # Prevent log(0)
loss = -np.mean(y * np.log(predictions + epsilon) + (1 - y) * np.log(1 - predictions + epsilon))
# Print Loss
if epoch % 100 == 0:
print(f"Epoch {epoch}, Loss: {loss:.4f}")
train_neuron(neuron, X_train, y_train, lr=0.001, epochs=1000)
y_pred = np.array([neuron.forward(x) >= 0.5 for x in X_test])
accuracy = np.mean(y_pred == y_test)
print(f"Test Accuracy: {accuracy:.2%}")
Got a 94% accuracy

Now let’s implement the loss functions and gradient decent in our libray
Following this article to learn about loss functions
Lets implement a Binary Cross Entropy / log loss

import numpy as npdef loss(y_true, y_pred, epsilon=1e-10):
y_pred = np.clip(y_pred, epsilon, 1 - epsilon)
return -np.mean(y_true * np.log(y_pred) + (1 - y_true) * np.log(1 - y_pred))
def gradient(y_true, y_pred, epsilon=1e-10):
y_pred = np.clip(y_pred, epsilon, 1 - epsilon)
return (y_pred - y_true) / (y_pred * (1 - y_pred) * len(y_true))
Ok so this is working fine
Now I am going to create a dense layer
implemented a dense layer class using our Neuron
import numpy as np
from axon.layers.base import Neuronclass Dense:
def __init__(self, input_size, num_neurons, activation_function):
self.neurons = [Neuron(input_size, activation_function) for _ in range(num_neurons)]
self.output = np.zeros(num_neurons)
def forward(self, inputs):
self.inputs = np.array(inputs)
self.output = np.array([neuron.forward(self.inputs) for neuron in self.neurons])
return self.output
Lets create another activation function Relu
Reading this article to understand RELU https://medium.com/@ardiansyahnasir56/understanding-the-relu-activation-function-in-neural-networks-4bf03fe1e9a3

def relu(x):
"""Computes the relu activation function."""
return max(0, x)
It was easy.
Now Let’s create a seqential model and also I have to implement optimizers
lets start with SGD (not gonna use this)
class SGD:
def __init__(self, learning_rate=0.01):
self.learning_rate = learning_ratedef update(self, layers, dL_dout):
"""Update all layers' parameters."""
for layer in layers:
if hasattr(layer, "backward"):
layer.backward(dL_dout, self.learning_rate)
Now lets create a model (Sequential using the dense layers)
import numpy as npclass Sequential:
def __init__(self):
self.layers = []
self.loss = None
self.optimizer = None
def add(self, layer):
self.layers.append(layer)
def compile(self, loss, optimizer):
self.loss = loss
self.optimizer = optimizer
def forward(self, inputs):
for layer in self.layers:
inputs = layer.forward(inputs)
return inputs
def train(self, X_train, y_train, epochs=10):
for epoch in range(epochs):
predictions = self.forward(X_train)
loss_value = self.loss.loss(y_train, predictions)
print(f"Epoch {epoch+1}/{epochs} - Loss: {loss_value:.4f}")
dL_dout = self.loss.gradient(y_train, predictions)
self.optimizer.update(self.layers, dL_dout)
Lets make a model using this and train on mnist dataset
Lets implement softmax because mnist is a multiclass dataset
Also we have to implement a categorial cross entropy for this dataset
[2:30 AM — 3 hours into the challenge]
Okay, MNIST needs multi-class classification. That means we need two things:
1. Softmax activation for the output layer
2. Categorical cross-entropy loss function
I quickly implemented both:
import numpy as npdef softmax(x):
"""Compute softmax values for each set of scores in x."""
e_x = np.exp(x - np.max(x)) # For numerical stability
return e_x / e_x.sum(axis=0)
def categorical_cross_entropy(y_true, y_pred, epsilon=1e-10):
"""Computes categorical cross-entropy loss."""
y_pred = np.clip(y_pred, epsilon, 1. - epsilon)
return -np.mean(y_true * np.log(y_pred))
def categorical_cross_entropy_gradient(y_true, y_pred):
"""Computes gradient of categorical cross-entropy loss."""
return y_pred - y_true
Pro tip: The np.max(x) subtraction in softmax is crucial for numerical stability. I learned this the hard way when my outputs turned into nan values during testing.
### Step #04: Building the MNIST Model
[3:00 AM]
Now for the main event MNIST classification. First, let’s prepare the data:
from sklearn.datasets import fetch_openml
from sklearn.preprocessing import OneHotEncoder
from sklearn.model_selection import train_test_split# Load MNIST
mnist = fetch_openml('mnist_784', version=1)
X, y = mnist["data"], mnist["target"]
# Normalize and split
X = X / 255.0
X_train, X_test, y_train, y_test = train_test_split(X, y, test_size=0.2, random_state=42)
# One-hot encode labels
encoder = OneHotEncoder(sparse=False)
y_train_encoded = encoder.fit_transform(y_train.values.reshape(-1, 1))
y_test_encoded = encoder.transform(y_test.values.reshape(-1, 1))
Now, let’s build our model architecture:
from axon.layers.dense import Dense
from axon.activations import relu, softmax
from axon.losses import CategoricalCrossEntropy
from axon.optimizers import SGD
from axon.models import Sequential# Create model
model = Sequential()
model.add(Dense(input_size=784, num_neurons=128, activation=relu))
model.add(Dense(input_size=128, num_neurons=64, activation=relu))
model.add(Dense(input_size=64, num_neurons=10, activation=softmax))
# Compile model
model.compile(loss=CategoricalCrossEntropy(),
optimizer=SGD(learning_rate=0.01))
Step #05: Training and Evaluation
[4:00 AM — The home stretch]
Time to train our model and see if we can hit that 90% accuracy target:
# Train
model.train(X_train.values, y_train_encoded, epochs=50)# Evaluate
predictions = model.forward(X_test.values)
predicted_classes = np.argmax(predictions, axis=1)
accuracy = np.mean(predicted_classes == y_test.astype(int))
print(f"\nFinal Test Accuracy: {accuracy:.2%}")
After 50 epochs, the results came in:
Epoch 1/50 - Loss: 2.3026
Epoch 10/50 - Loss: 0.8342
Epoch 20/50 - Loss: 0.4217
Epoch 30/50 - Loss: 0.2891
Epoch 40/50 - Loss: 0.2104
Epoch 50/50 - Loss: 0.1762Final Test Accuracy: 91.23%
*5:00 AM]*
We did it! Starting from zero knowledge of Python to a functional neural network library achieving 91% accuracy on MNIST in just 5 hours. Here’s what we built:
1. Core Components:
-Neuron class with forward propagation
– Dense layer connecting multiple neurons
– Sequential model for stacking layers
2. Activations:
– Sigmoid (for binary classification)
– ReLU (for hidden layers)
– Softmax (for multi-class output)
3. Loss Functions:
– Binary cross-entropy
– Categorical cross-entropy
4. Optimizer:
– Stochastic Gradient Descent (SGD)
1. Numerical Stability is crucial — those tiny `epsilon` values matter more than you’d think
2. Vectorization with NumPy makes everything faster
3. Testing Each Component separately saves hours of debugging
4. Python isn’t that scary when you’re motivated by a challenge
Would I recommend building a neural network from scratch with no Python knowledge the night before an exam? Probably not. Was it incredibly rewarding? Absolutely!
The best part? This is just version 0.1 of AXON. Next steps could include:
– Adding convolutional layers for image processing
– Implementing more optimizers like Adam
– Adding batch normalization
– GPU acceleration
But for now, I need to get at least 2 hours of sleep before that web development exam……….


